Setting up the Amethyst OSC plugin for Quest
Pre-requisites
Webcam and PS4 Camera are not supported!
Amethyst is for Kinect tracking mostly. We do not have support for 2D cameras. And most likely, never will.
As long as your computer runs an up-to-date version of Windows 10 or 11, and was built in the last decade, you’re most likely good to go. We recommend taking a look at the USB Controllers section in Amethyst Installer, you should have at least one compatible controller to have a good experience.
As well, you need to have some kind of compatible hardware. Like Xbox 360 Kinect, Xbox One Kinect or a complete PlayStation Move + PS3 Eye setup in PSMoveServiceEx.
Part 1: Wi-Fi is not internet!
Your internet speed does not matter!
The speed of your internet connection, what allows you to visit websites and play online games, does not matter. In fact, you could have the old 90s dial-up internet with the funny modem sounds and it wouldn’t matter.
Because OSC goes over the network, you need to make sure your Quest is connected to the same local network as your PC.
This part only really applies if you have two Wi-Fi routers. You would probably know if you have two of those.
If your PC is connected to the router with a cable, then make sure the Quest is connected to the Wi-Fi network that router is on.
If you’re using a Wi-Fi adapter on your PC, or using a laptop, make sure the PC and the Quest are on the same Wi-Fi network.
If you get nothing on the Quest after connecting OSC trackers
This isn’t guaranteed to work, but sometimes, you will have separate Wi-Fi networks for the 2.4GHz and 5GHz bands. And some routers will only show devices on the 2.4GHz network to devices connected with a cable. So, try connecting to the 2.4GHz Wi-Fi specifically if they are separate. Though 5GHz is preferable.
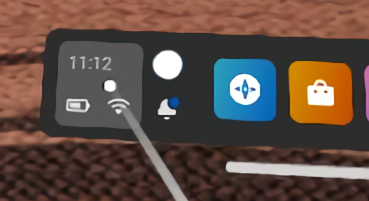
- Open the Quest’s Universal Menu
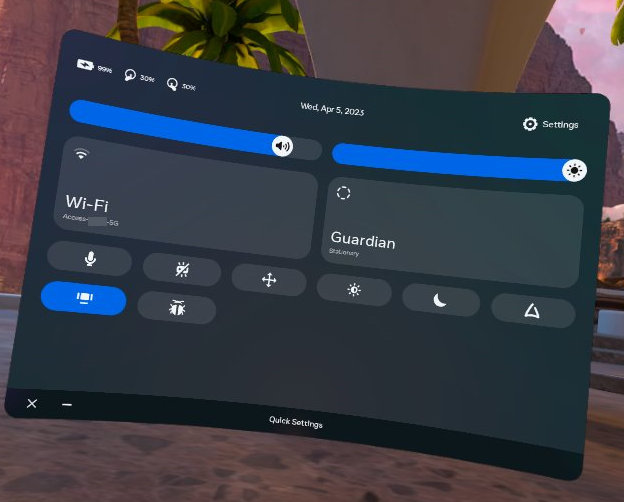
- Click on “Quick Settings” on the left side
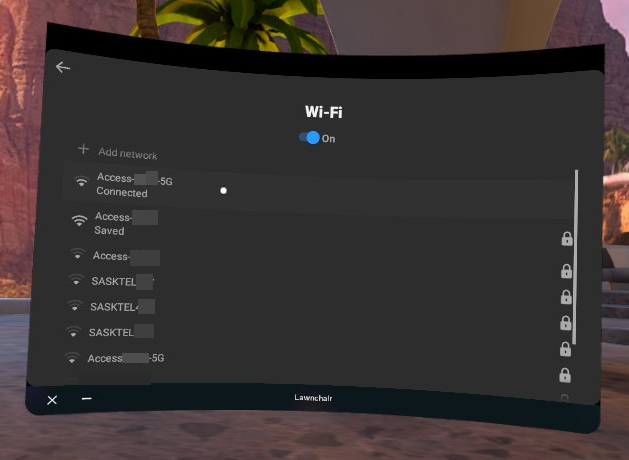
- Click on Wi-Fi
- Connect to the desired network if it isn’t already
- Click the network itself once it’s successfully connected
- Scroll down to Advanced, then click on that
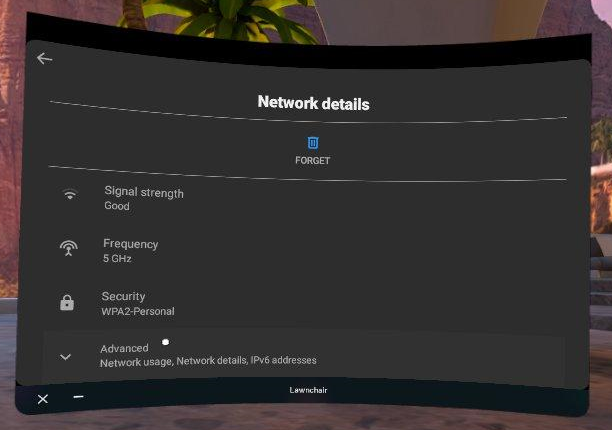
- Scroll further down until you see IP Address
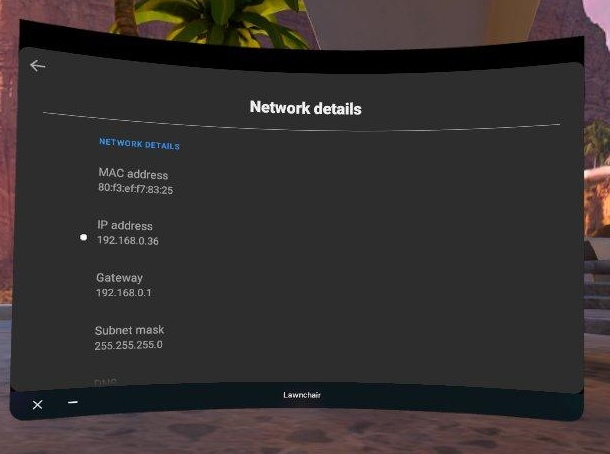
This is what other devices in your house see the Quest as and you will need to enter it in Amethyst, so keep note of it.
Part 2: Setting up VRChat
- Launch VRChat on the Quest
- Open the Action Menu (the round one) by pressing and holding one of the Quick Menu buttons
- Go to “Options”, then “OSC”, and toggle on “Enabled”

It’s easy to forget this step, and then spend 20 minutes wondering why it’s not working. so make sure to do it now instead of later.
You are now ready to receive OSC Tracker data!
Part 3: Installing Amethyst and the plugin
Install Amethyst using the button below:
In the setup, select the OSC Trackers option.
Part 4: Final setup
You now have VRChat ready to accept OSC input, and Amethyst ready to send OSC to the Quest.
-
Start Amethyst
-
DO NOT CONNECT TRACKERS
-
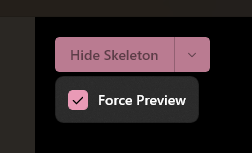
Click the dropdown next to the Hide Skeleton button in the corner of the black window, then check on “Force Preview”
-
Make sure the Kinect can track you properly. Ideally, make sure it can track your head.
See the Improve tracking page for tips to get the best tracking out of your Kinect.
-
Go to the Settings tab on the left of the app
-
Search for “Endpoint”
-
Make sure it says “OSC”
-
Insert the IP Address of your Quest from earlier. DO NOT CHANGE THE PORTS.
-
Go back to the Home page.
-
Click the “Connect Trackers” button.
-
Launch VRChat on your Quest
-
Open the Quick Menu (The square one)
-
For testing sake, please try a default public avatar first.
-
Let’s change a few settings for a better experience
-
In the Quick Menu, click the Settings tab, the one with the gear icon
-
Scroll down to Tracking and IK
-
Change the Avatar Measurement to Height Scale
-
Once you’ve changed avatars, open the Quick Menu again and click on Calibrate FBT
-
You will be in a T-Pose, with the trackers represented as spheres.
-
You can bind into the avatar by pressing both triggers together.
-
Open the Quick Menu again and return to Settings, then Tracking and IK
-
This time, change Lock Behavior to Lock Head.
-
Specifically, this allows the Kinect trackers to drift back into position over time and makes your overall body position based on your headset movement, it looks a LOT better for Kinect.
-
Open the Quick Menu again.
-
Click on Calibrate FBT
-
You will be in a T-Pose, with the trackers represented as spheres.
-
Open the Quick Menu again
-
Go to Settings then Tracking and IK
-
You can confirm the calibration by pressing both triggers together.
Enjoy FBT on Quest!!!!
Part 4B: What to do the next time around
- Start Amethyst
- Make sure the Kinect can track you properly
- Go to the Devices tab on the left of the app
- Click on Amethyst OSC
- Change Device IP to the one you took note of earlier
- Click “Connect Trackers (OSC)”
- Launch VRChat on your Quest
- Open the Quick Menu (the square one)
- Click on Calibrate FBT
- You will be in a T-Pose, with the trackers represented as spheres.
- Open the Quick Menu again
- Go to Settings then Tracking and IK
- Click on Auto-center OSC trackers
Mirrored trackers
If the tracker movement is mirrored in VRChat compared to what you’re doing. Click the auto-center button again.
- You can bind into the avatar by pressing both triggers together